Welcome!
Thanks for choosing to partner with us! We look forward to working with you and we’re confident that we’ll be able to run a successful marketing campaign that will generate real results for your business.
1. Service Agreement & Statement of Work
I’ve sent you these documents via SignWell. Please review these documents (combined into one longer document) and don’t hesitate to ask if you have any questions. If everything is in order and you’re in agreement, you can use the e-signing options online. Please check your email for the document link.
2. Kick Off Invoice
As per the Service Agreement, there is a retainer fee as part of kicking off the work. You can fill in our secure form to provide your credit card, or send an e-transfer if you’re in Canada to [email protected], or for non-Canadians you can send a Paypal payment to [email protected]. For ongoing campaigns, after the set-up month, we’ll move to automatic credit card billing unless otherwise arranged. We will always send you an invoice three days before the automatic billing so that you have a record for your accounting.
3. Intake Forms
There are 3 intake forms:
- Discovery Form (if we covered this during our initial consultation, please disregard)
- Branding Elements Form
- Secure Password Form
a) Discovery Form
For the Discovery form, we may have already covered this, but please fill in as much as you can so that we can learn more about you.
b) Branding Elements Form
The Branding Elements form is designed to collect important assets like your logo(s), fonts, colours, etc. If you already have your brand elements organized in a Google Drive or Dropbox folder, you can go ahead and share it with us:
- Google Drive: [email protected] (preferred)
- Dropbox: [email protected]
c) Secure Password Form
The Secure Password form is exactly that–a completely secure way to collect your sensitive data using our SSL certificate. In addition to collecting your social media and website passwords and logins, we also collect your billing information. Our process is to send you an invoice a few days before the end of each month, and then billing takes place automatic on your credit card at the beginning of the month.
Please note that the form will not be complete until you’ve reached this final confirmation page:

4. Facebook
We need two kinds of access for Facebook:
1. access to your page for regular organic Facebook posting
2. access to your business manager and ad manager for your paid advertising
1. Regular Facebook Posting
On Facebook, we’ll let you know when we’ve sent the request to your page to add Barker Social Marketing as an agency. Click here to learn how to accept an Administrator request on Facebook.
2. Paid Advertising on Facebook
Please note that almost everyone does this part incorrectly so if you’d like us to take care of it for you, it may be easier and not waste your time to provide your Facebook login in the secure form and we can take care of this set up. We will only use the login for this setup and we will not look at any of your personal account information. Otherwise these are the steps you will need to follow:
For your advertising, you must have a Facebook Business Manager account and Ad Manager account, not just a regular Facebook account. This is through business.facebook.com. These accounts will provide the ability to run ads with full targeting and marketing capabilities.
If you don’t already have these necessary accounts and you would prefer not to get our help, you can make them by following these links:
- Create a Business Manager account: https://www.facebook.com/business/help/1710077379203657
- Create (or add) an Ad account: https://www.facebook.com/business/help/910137316041095
Once you have a Business Manager and Ad Manager, please follow these instructions to find your Facebook Ad Account ID number (it’s not the first number you think it will be) and please send the correct number to us. We’ll use it to send you an invitation, which you can accept.
**If you would prefer that we take care of all of this for you, you can share your Facebook login with us and we can do it for you. We don’t normally collect your private Facebook login but some people just find that easier. Please use our secure form and write your login in the comments section.
5. LinkedIn
If applicable, for LinkedIn we will let you know who to add as an administrator of your business page. Click here to learn how to add an Administrator to your LinkedIn business page.
6. Twitter, Instagram, Pinterest
There is no way to add an administrator or manager on Twitter, Instagram, or Pinterest. For those, you’ll need to share the passwords using our secure form.
7. Google Analytics
You have the option of providing your Google login in the secure form and we can take care of this set up, or otherwise these are the steps you will need to follow:
If you already have Google Analytics on your website, please add a user for the email address:
Please check the boxes for Read & Analyze and Manage Users like this:
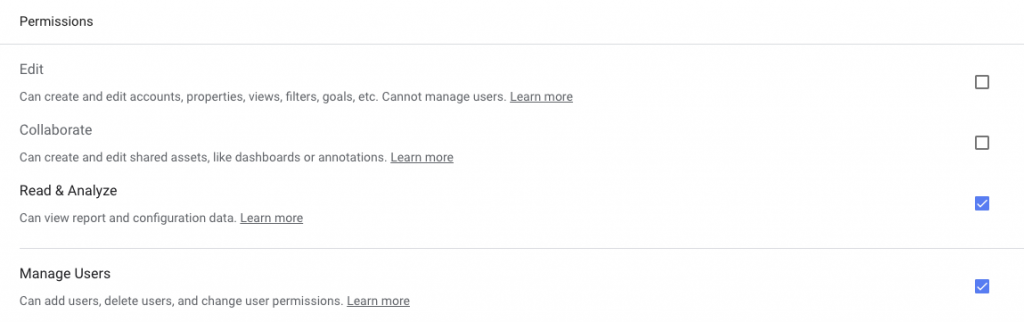
**Please note that we will require the ability to manage user rights so that we can connect a special email address that will collect your website data for reporting. If you prefer, you may add it yourself: cloud-campaign-backend@cloud-campaign-facade.iam.gserviceaccount.com
Click here to learn how to add an Administrator to your Google Analytics. If you don’t have Google Analytics, please let us know and we can help to get that set up.
8. Google Ads
1. Create a Google Ads Account or login to your existing account if you already have one. Make sure the account is updated with all of your information required including the business name, address, payment method, etc.
2. Go to Tools & Settings » Access and Security »» Add User [email protected]
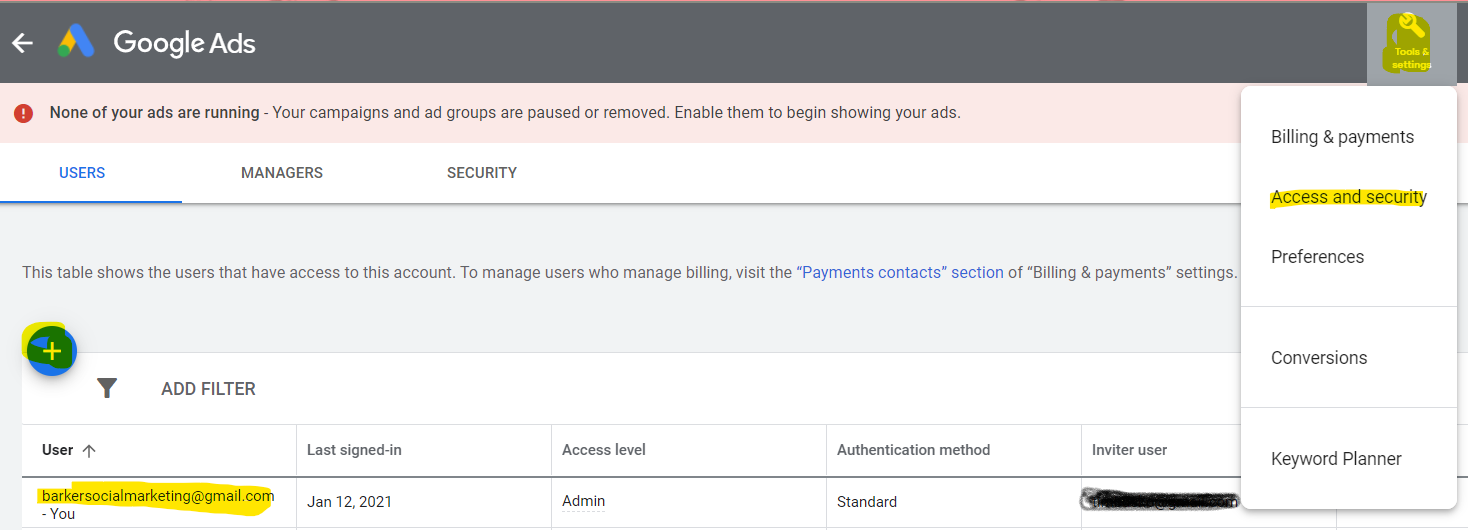
We’ll then receive an invitation which, after we accept it, we’ll have access to the account and we’ll be able to create Google Ads.
Otherwise, you may give us the Google login for your business account in our secure form and we can create the account.
9. YouTube
If applicable, please add [email protected] as an administrator following these steps.
- On YouTube, sign in as the owner of the Brand Account.
In the top right, click the account icon and select the channel you want to manage. - Go to the channel’s account settings by clicking the channel icon > then Settings or settings icon Settings
.
- Click Add or remove managers. You’ll be redirected to the “Brand Account details” page.
- Click Manage permissions. You’ll see a list of people who can manage the account.
- To invite new people, choose Invite new users Ask people to manage.
- Enter their email addresses: [email protected]
- Below their names, choose their role: Manager (Note that communications managers don’t have access to YouTube channels and won’t be useful.)
- Select Invite and then Done.
10. Unique Branded Links
If applicable, we would like to offer to set up unique shortened links to use for your brand. These look very sophisticated and make a positive brand impression. Here’s an example: go.barkersocial.com/value
- Log into your domain hosting account (GoDaddy, Hostgator, Register.com, etc).
- Navigate to DNS Settings page.
- Add a new record for the root domain name:
- Record type: A
- Hostname (or Name): go
- Point to (or Address/Value): 52.72.49.79
Notes
Phew! Got all that? We know that there’s a lot, but don’t worry! Once we’re through this initial phase, we’ll be ready to rock n’ roll!
An important note: our Project Coordinator, Laura Barros, is located in Portugal. As we test some of the logins, you may notice logins that list Portugal. Not to fear, that’s us! This is also true of our Web & Tech & SEO Gurus, Pablo & Jay Zambrano, who are located in Colombia.
Don’t hesitate to contact us whenever you have questions and thank you for your business.
Learn about our process, click here.
Thanks, we can’t wait to get started!
The Barker Social Team


